Thursday 31 January 2019

AHPC IX - Status Update #2

So I managed to miss the Week 3 deadline for submissions, which meant I submitted two posts in week 4 of the Challenge...

Pleased to say that I am currently ranked 24th out of 80 with 461 points.

So how are points awarded? I hear your guys saying  - well the internationally recognised system is as below. This should give an unbias perspective one of our club's regular discussion point s - what is the 'value' of a 6mm figure versus a 15mm or 25/28mm figure. 

We can now say that 15mm figures are 4 times as valuable as 6mm figures and 28mm figures are 10 times more valuable than 6mm figures. Blue touch paper now lit! 


The Scoring

Below is the scoring that will be used for the Challenge. 

6mm foot figure = 0.5 point
6mm mounted figure, artillery piece or crew served weapon = 1 point
6mm vehicle = 2 points
10mm foot figure = 1 point
10mm mounted figure, artillery piece or crew served weapon = 2 points
10mm vehicle = 3 points 
15mm foot figure = 2 points
15mm mounted figure, artillery piece or large crew served weapon = 4 points
15mm vehicle = 8 points

20mm foot figure = 4 points
20mm mounted figure, artillery piece or crew served weapon = 8 points
20mm vehicle = 15 points

28mm foot figure = 5 points

28mm mounted figure, artillery piece or crew served weapon = 10 points
28mm vehicle = 20 points
40mm foot figure = 7 points
40mm mounted figure, artillery piece or crew served weapon = 15 points
40mm vehicle = 25 points 
54mm foot figure = 10 points
54mm mounted figures, artillery piece or crew served weapon = 20 points
54mm vehicle, limber, etc. = 30 points 
Other scales, miscellaneous models/figures will be scored on a submission-by-submission basis. 

Monday 28 January 2019

AHPC IX - From Mike W: 28mm Various Figures (55 Points)

So the second post this week - but covering week 4 items I have painted....

This week it is a hodge-podge of different items off the workbench, some just to clear space, others to meet the need of games that are coming up and some just as experiments on new ways to paint figures!

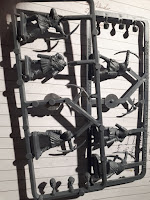
Warlord Games Spartan Hoplite Frame.
I'll start with 5 x 28mm Warlord Games, plastic Spartan Hoplites. I've had a box of these plastic fellow under the workbench for a couple years, I even tried to paint some a while back but lost interest so I took out a frame this week determined to give them a fair crack!

Undercoated figures minus Shield arm!
These are the figures I decided to experiment with, having build 5 hoplites I left off the shields to paint these separately and allow access to the figure's body during paining.I undercoated the figure dark brown where ever there would be a bronze/brass finish and white elsewhere.
Separate Shield Arms...

On the back of the shied I then dry-brushed with a light leather  before picking out the arm in white.

I don't know how common red was for Spartan tunics, but that is what these guys got, and I also did their helmet plumes in red as well. Flesh was added and then leather work was added in before paining in the spear shafts.

I used Brass to do all the helmets shields and grieves, one figure had a metal back & breastplate that was also done in brass.

Here's where the experimenting began in earnest. Instead of using dark Tone Army dip as usual I decided t try and use different washes to brig out the colours in the figures. i used Flesh Ink to add depth to all body and brass fittings as well as to the spear shafts. I used Dark tone ink to cover all other areas - tunics, crests and body armour.


I'm quite please with the results!

Calculations: 5 x 28mm Infantry @ 5 Points each = 25 Points

Gripping Beast Frames
Next up were 4 Medieval Archers from the Gripping Beast Plastics set,I have a bunch of these to do and they will likely appear in the coming weeks...

Again the plan was to see if I could achieve good results using Dark Tone wash instead of the dip product. As much as I love the dip it has two problems - it smells as it is oil based and I always end up throwing out half a tin of it as it dries out before I can use all of it. I've tried mixing in white spirit or paint thinners - and that does help some - its still messy and the quality of the finish drops once it has been thinned.
Finished Medieval Archers

So painting was very straight forward, a white undercoat and then various
brown, green and ochre tones for the peasant clothing. Once dry the dark tone wash was added, i watered it down slightly to stop it being too overpowering and the wash was dry within 10 minutes - Job done!


I based the figures as usual on UK 2 pence pieces and gritted & flocked the bases to match the rest of the collection

Calculations: 4 x 28mm Infantry @ 5 Points each = 20 Points

Final item was the painting of a Semi-Culven cannon for the 17th Century collection - I have several guns in the collection - each has separate crews and so this is another to round out the options.


This model is painted with a blue carriage with iron fittings and brass gun, all finished with a Dark Tone wash. The base is simple, with the addition of randomly cut wooden coffee stirrers to represent boarding and this is given a brown wash to add depth of colour. Base is the gritted and flocked.

Calculations: 1 x 28mm Artillery piece@ 10 Points each = 10 Points

Grand Total: 25 Points + 20 Points + 10 Points = 55 Points

Spoiler for next week - I spent time this week preparing a 28 man, 28mm 17th Century Infantry Regiment for painting, a Saxon Regiment to support their Austrian allies at the Siege of Vienna in 1683. Additionally I hope to get a couple of gun carriages and horses done to go with the above gun!

Spoiler Alert - 17th Century Saxon Infantry Regiment ready to go!


AHPC IX - From Mike W: 28mm 17th Century Brandenburg Dragoons (70 Points)

Week 3, saw me working away again for most of the week, resulting in little time to get any figure painting done. Hence a late post for the output for Week 3 and hopefully a second post at the end of the week with additional figures painted as I work to catch-up on my planned schedule!

Anyways,the subject matter this week is a Squadron of Brandenburg Dragoons in the service of Saxony, who were allied to Austria and this sent troops to help relieve the Siege of Vienna in 1683.

Raw metal Brandenburg Dragoons and Officer
Additionally there is a Brandenburg Officer to lead the contingent. All figures are 28mm, with the dragoons being from Essex Miniatures and the Officer from Riever Castings, albeit he is mounted on an Essex horse.

Once again the dragoon figures were sourced from an eBay lot, as was the Officer - which has actually been hanging around my workbench a couple of years waiting for a suitable unit to lead!

Starting state of Officer figure. 
Unpainted horse,undercoated figure and detailed 
hands & face (over-painted by myself)

Eagle-eyed readers will note that the officer was pre-undercoated, he did however have face & hands painted when I got him.

That said I over painted what was previously done on this figure to fit in with my painting style - so hopefully everyone will agree this previous painting also counts as an undercoat!

What I quite like about these figures is the squat, non thoroughbred look of the horses - as would befit a Dragoon unit that would have to make do with second rate nags to mount themselves, once the Cavalry units have creamed off the best horseflesh for themselves....

This unit has been painted up as a generic Dragoon unit, dressed all in blue. I used standard Ultramarine blue but added a little black to darken the tone, knowing that when the shading dip was added the colour would go even darker, befitting the dark blues preferred by the Brandenburgers.

The horses and figures were painted in my usual manner, so I will not repeat this description. However, I will talk a little about how I use Army Painter dip. Unlike the product description, I never dip the figures into the gloop!

Instead I get a good sized paintbrush and paint on the varnish, ensuring a generous covering and that it gets into all the nooks and crannies of the figure. I then set the figure aside and repeat the process on a couple more figures, before coming back to the first one.

This is usually just enough time for the dip to have 'drained' down the figure and gently pool around the base of the figure, whilst leaving the shading effects in the clothing folds and recesses of the miniature.

Where there is pooling in inappropriate areas or the pooling is too heavy - the dip is still wet enough to rework using the brush to lift off any excess dip and ensue a good smooth final result.

Set the figures aside overnight to dry.

Figures painted with Army Painter 'Dip', in their very shiny state, pre-matt varnish

Next day I base the figures by painting the MDF or plastic bases with emulsion brown paint which has had a healthy mix of PVA wood glue added to it in the pot. This ensures that he paint bonds to the base and dries hard after I have sprinkled fine sand on the wet paint to give the base texture.

Once the sand is well and truly stuck- usually about 2-3 hours, I add more paint and sprinkle over electro-static grass to give the base vegetation layer. Again another wait until all is dry and I add various coloured grass tufts and other vegetation & flower clumps to the base - as I see fit.


Finished Officer
Finally the whole unit is spray painted with Army painter matt varnish to eliminate the glossy dip finish and the any standards or flags are added to the models to complete the unit.

Dragoons with matt varnish applied and bases flocked
In this case the standard is again printed from something I put together basis internet images and descriptions, I have just changed form an inkjet to a laser jet printer (Xmas present to myself) and the finish quality of the standards is so much better!

Points Calculation: 7 x 28mm Mounted Figures @10 Points each. 70 Points

Monday 14 January 2019

AHPC IX - From Mike W: 28mm Mountain Men (96 points)

Well, week three of the challenge! It’s been a funny old week, two days away, travelling for work and the two day unwell, with no inclination to lift a paintbrush...

15 x Mountain Men on foot
Luckily, I had got ahead of the game last and done a lot of work on another eBay lot I’d acquired some time ago - this time 15 x 28mm Mountain Men on foot and an additional two mounted.

2 x Mounted Mountain Men 
The figures looked great, full of character, so I wanted to do my best in bringing that out on the finished figures.

My plan is to use these figures to supplement the volunteer forces fighting for Texas against Mexico in the Texas Revolution.

Batch #1,with 2 Scotsmen and Chinese gentleman 

Batch #2 Two of these figures I added rifles to their empty hands, can you tell which ones?

Batch #3, guy at right end has military trousers on with red strip, added by using a red pen
There were a couple of interesting figures in the group, two Scotsmen, one in a kilt and a Chinese man armed with a machete!

I decided I could warrant his presence by him as a cook or labourer who’d got caught up in the Texan excitement.
As most of the figures would be in buckskin, I used a variety of browns to paint these guys, I used contrasting browns to paint the numerous fringes on their jackets and trousers and I gave a couple of them sky blue military trousers, just for effect.

Scotsman #1 

Scotsman #2 
A couple words about the Scotsmen, I painted the kilt as follows, a base of bright blue, then horizontal and vertical green stripes were added. When thoroughly dry I got out a black and a red pen, drawing in a black line, horizontally and vertically through the blue stripe. I repeated the same, using the red pen, to add lines on the green stripe.

I then used the red pen to draw in the dicing on the base of the Tam O’Shanter,I finished off this guy with firey orange hair to affirm his Celtic roots, I used the same dicing method around the top of the kilted chap’s socks.

I’ve discussed how I paint horses before, so won’t bore you again with this. The learning from this week’s batch came when I started to varnish them.

I decided to try something different - mistake!

I usually varnish my figures as follows - apply Army Painter Dark Shade as a painted on varnish, this drys rock hard an is very glossy. I then spray with Army Painter Matt varnish and job done.

This time I decided to use a different Matt varnish that be painted on, when I say different, I mean cheaper....

Mounted Mountain Men
I varnished one mounted figure as a test, (the one on the dark horse), as the varnish dried it created a white, powdery residue all over the figure. Disaster!

Luckily, I remembered reading somewhere that if this happens, simply add a new coat of varnish from a ‘good’ manufacturer and it will fix the problems, if the first coat is not fully dry. I had a bottle of Army Painter Matt varnish, I applied a new coat very quickly and the was resolved.

The new bottle of varnish is now in the bin.

Calculations: 15 x 28mm Foot @5 points each = 75 points, 2 x 28mm Mounted @10 points each =20 points. TOTAL = 95 Points

AHPC IX - Status Update


Whilst the idea of the Painting Challenge is to work against a self set target, it is always interesting to see how well you are doing against others on the challenge.

So I set my-self a target of painting 2000 Points worth of Wargame's figures during the 13 weeks of the challenge, to do this I need to paint about 150 Points worth of figures a week! Already that is feeling alike a high bar to reach.

This means about 30 foot 28mm figures or 15 mounted 28mm figures each week,  when I last looked, for week two, I had 195 Points and that put me 34th out of 80 participants. Fair to Middling, could do better!

Monday 7 January 2019

AHPC IX - MikeW - 28mm Ottoman Turk Light Cavalry & Officers - 90 Points

Raw Ottoman Figures

Last week I was able to complete the batch of Ottoman Light cavalry and commanders that I obtained in an eBay lot in December. I have also been able to make some good progress on a second eBay lot of 15 Mountain Men on foot plus 2 on horseback - however - they will not be ready for this week's deadline 😒

So here's the lot as it arrived, pre-primed in a mixture of black and white,with many of the figures separated form the horses, I took time to file off any flash and re-seat the figures on their horses and to re-apply an undercoat where needed.


I decided to go with the black undercoat on the horses where this was good, others I applied my normal white undercoat. Undercoat colour definitely impacts the final colours you get - as you'd expect black undercoat mutes most colours applied to it....

The batch represented 3 Ottoman Commanders plus a unit of 6 Mameluke Light Cavalry, on closer inspection the Mamelukes were mostly Riever Castings figures (with one exception, that I can't place) and the Ottoman Commanders were likely from another unknown company - simply due to the different casting qualities.

The painting techniques were very similar to those I discussed on my first post, building up from a white undercoat with layers of colour, adding detail and metalics at the end before fixing all the errors and mistakes I made!

Completed Mameluke Light Cavalry

These light cavalry were a riot of colour, so I have deliberately mixed many colours into the unit to give it that irregular look, I have also mixed the colour of the horse furniture to add to the irregular look.

The 'Red' Mameluke
I tried to get some idea of rich silk clothing by adding some patterns to a couple of the figures, I kept it simple using 'triangles' of dots in contrasting colour - a tip I read many years ago, the effect can be best seen on the 'Red' Mameluke. Unfortunately my photography skills are lacking, not sure how well these show up and the photo makes it appear that the figure is gloss varnished when in fact it has had several layers of Matt spray varnish this morning! Tips on camera settings welcome!

The horses were a variety of colours, I have a chart of all the common horse colourings and so use this as a basis for all horseflesh I paint. I apply the base colour and then usually paint the mane, tail ad lower legs black, If the mane or tail is a lighter colour  - I the add that colour before adding white blazes to the horse's head and a variety of socks to their feet.

Hooves are painted a dark tan colour before adding the reins and other saddle / tackle to the figure. Inevitably I have to fix a lot of the base colour after that process and then I add in metalics at the end as usual.

Using the Army Painter Dark Tone dip for figures gives a great shading effect for the horses and blends in all the colours to one unified result.

'Odd one Out' Mameluke

Ottoman Commander #1
You'll notice a couple of greys in the mix for the officers and the 'Odd one Out' Mameluke and a couple of the ottoman commanders. I got this effect by using a light grey base coat and then dry brushing with white - the more dry brushing you do the lighter the horse will get!

White socks and blaze are then added and on all greys I dry brush their snouts (don't know the technical term for a horse's mouth area!) flesh coloured. In fact I do this for any horse that has a white blaze that reached their mouth area - seems that's what happens for real horses as well! Again the dip adds shading as required...

Ottoman Commander #2
Ottoman Commander #3
Points Calculation: 9 x 28mm Mounted figures @10 points each = 90 points

Wednesday 2 January 2019

AHPC IX - MikeW - 28mm 17th Century Polish Hajduk Infantry - 100 Points
So here it is the first ever post to an AHPC event....

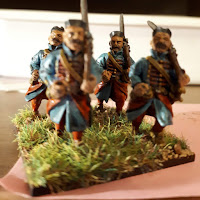
Assault Group Polish Hajduks
These are 28mm Assualt Group, Polish Hajduk Infantry who will make up a unit in the Polish intervention force in my Siege of Vienna (1683) project.

The Raw Figures
The infantry in Polish service at this time were very much considered to be second to the cavalry arm - with the famous Polish Winged Hussars, supported by Pancerni armoured cavalry and Cossack Irregulars.

The infantryman was considered a peasant - hence the name Hajduk, armed with a musket and a sword and dressed in simple coat.

Many units were however, well drilled and well dressed, this unit being one of those that helped liberate Vienna.

Four man base, 3 x Musketeers plus 
1 x NCO with Poleaxe
Eagle-eyed readers may note that I have painted 22 figures - optimally I would have liked a 6th base of four figures but only two suitable ones were available in  the lot! Thus I am waiting on some additional figures to be supplied to finally complete the unit to 24 in total - I will claim the points on these when I get these done!
The figures were source from eBay, without the optimum mix of musketeers, Command and NCOs armed with poleaxes! This this unit is painted as 5 bases of 4 figures, 20 in all.

I usually undercoat my figures with white paint, I did so with these, and began painting the blue coats, then the red trousers and coat linings. Red chest braiding was added by dry brushing over the raised detail.

Next was the leather work - belts and boots, followed by brown for the muskets and yellow/brown for the flag staffs and poleaxe shafts...

4 Musketeers in various marching poses
Metalwork next - first oily steel for musket mechanisms, barrels, sword scabbard fittings and poleaxe blades, followed by brass for buttons and sword hilts etc.

I usually paint on the flesh first, to bring the undercoated figures to life but this time for some reason, flesh was left to the end. Then hair was added for mustaches and forelocks.

The colour process is then repeated as I fix all the mistakes, smudges and other errors that I can spot before applying a coat of Dark Army Painter dip to provide shading. I always apply this by brush and work it into figures, I don't like getting too much on each figure as it would spoil the detail.


The command base was made-up pretty much as per the other bases, it consists of two standard bearers, a drummer and an officer.

The standards are made via help of Microsoft Paint and images taken form the internet.

The officers of the day were generally free to dress as they wished, I have kept this officer fairly well in tune with his unit in blue coat and red trousers


Bases are 40mm x 40mm 2mm MDF, covered with fine sand and then dry-brushed and sprinkled with electrostatic grass.
2nd NCO base

Spoiler Alert! So what's next? I have a couple options, a group of 15 foot and 2 mounted 28mm Foundry Mountain Men, these are already undercoated and will join the Texicans who are bravely fighting against Santa Anna's Mexican army. Again this batch came form eBay and strangely includes a Chinese gentleman armed with a Machette - I'm pretty sure there were no Chinese people at the Alamo but he can add colour to the Texan Independence campaign!

The other option is yet another group of eBay finds, 6 x 28mm Ottoman Light Cavalry - actually they are Mamelukes from the Reiver Castings range, with them came three Ottoman mounted officers. Again all are undercoated and awaiting a lick of paint, immediate foes to the just completed Polish Hajduks!

So Points tally: 20 x 28mm Infantry @5points each = 100 Points!

See more about the Challenge and other competitors <here>