Monday 31 January 2022

AHPC XII: From Mike W - 25mm WW2 British Infantry

 Amazingly I have finished a 4th batch of figures this week, here are 19 x WW2 British Infantry, mostly weapons teams, command or communication bases. The figures are plastic 25mm Valiant Miniatures which are sold as 1/72 figures but are rather oversized in my opinion.

WW2 British - Odds & Ends to complete an old job!

The Valiant Boxed Set allows you to build 68 figures, I made-up eth other figures quite some years ago and these are all that were left in my spares box, so I decided to paint them up for use.

There are two 2" mortar teams and an HMG team

There's actually also two much large mortar models in the set

Two Command Teams and a communication team

The guys pointing are actually also carrying a clipboard, whilst the kneeling officer has a Sten Gun.

A guy with a PIAT

PIAT resting on a low wall

And lastly a six man squad.

Five Riflemen with the classic Lee Enfield and an NCO with a Sten Gun

To make my point about the size of these figures,
a command stand next to the Kangaroo RAM and riders from an earlier post this challenge

So these guys were all undercoated in white, before overpainting with Valliejo 'English Uniform' which I'd lightened with some white paint. Webbing was then added using Citadel 'Nurgling Green' and setting aside to dry after adding brown boots for officers and black boots for other ranks.

Gunmetal was added as required for revolvers, rifles, Sten Guns and Binoculars after which Citadel 'Vermin Fur' was used for the rifles' woodwork. Flesh and hair was added before painting the helmets neat 'English Uniform' and then highlighting the leaves in a bright green.

All was then washed in a watered down Army Painter Dark Shade and then matt varnished.

AHPC XII: From MikeW - Warlord Games ACW Epic - Union Regiment

 I've had these figures under my workbench pretty much since they were released by Warlord Games, about a year or more ago, the concept really caught my imagination, although I have a pretty large 15mm ACW collection, I wanted to get in on this bandwagon.

The Union Infantry Regiment with accompanying mounted Officer and Artillery Battery

I did paint-up one stand of Rebel figures but my enthusiasm was dampened by the fact that my old eyes were not quite up to the job (in my opinion!). There's a reason why my preferred gaming & painting scales have gradually increased from 15mm to 25m to 28mm and now the heroic 32mm figures!

So the sprues have languished under the workbench until now. With Warlord now releasing their Napoleonic Epic figures and hinting that there may be other period in the works I thought it time to retry the concept!

Close-up of the Infantry Regiment

So here is a 'bog standard' Union Regiment of 100 figures on five stands. I undercoated these all with Ultramarine Blue - yes a departure from my usual white. I thought that due to the scale it might work better to go with a base colour that needed little further work.

I added sky blue trousers the same evening - although these had to be retouched due to me missing a lot of detail - due to poor light. Lesson learnt! Boots, hats and belts were added in black, I used a Black Sharpie pen for the belts but paint for the rest.

Close-up on Officer and Infantry

Muskets were done in brown and then steel barrels added before adding in brass details on muskets, belt buckles etc. Flesh was then added along with a variety of hair colours.

I then spent quite some time fixing my mistakes and better defining details etc before applying an Army Painter Dark Wash.

Close-up on Artillery and Infantry

Basing was tricky - I added one rank at a time, with fine sand and electrostatic grass, before repeating when adding the second rank. 

I did a similar process for the gun and officer figure.

Close-up on Artillery Battery

Controversially, when it came to points I have taken a per figure value of 1.5 Points each. In my opinion these are not 15mm figures, they actually match 12mm figures pretty well, so I have gone for a mid point value between 10mm & 15mm figures as noted on the Challenge listings.

Finally a close-up on the Officer, apologies for the quality of the shots,
photographing such small figures is a challenge in its self!

AHPC XII: From Mike W - 28mm Warhammer Lizardmen Riders

 A busy week at home and work this week so I have reduced my output accordingly, that said I'm hoping for anther three posts by the weekend. This one is a set of Warhammer Mounted Lizardmen - I have a second foot unit to complete in a later week as I am waiting on a delivery of appropriate shields from eBay!

The completed unit of five Saurus Riders on Cold Ones

I really liked the idea of a Lizardman Amy but never really got around to it - so I have dragged these figures out of the drawers to submit this year. They were originally rescued from the loft during last year's challenge but I never worked up enough enthusiasm to tackle them before now.

Another view of the unit

As ever I started with a white undercoat, the Cold One beasts - I decided to do Blue and Green. Blue underbellies and Green scales and hide, the riders were to be Yellow-ish and Green to give some contract but an overall Green feel.
Close-up of the Unit Commander

Maybe that's why I never really got round to painting the Lizardmen army - with a large Orc collection - there was just too much green!
I used a dark green on the upper part of the bodies and then lighter blue or ochre tones for the underbellies. When dry, I dry-brushed each with lighter tones to get highlights before applying a Blue, Green or Light Brown wash appropriately to the figures.

Claws, horns, teeth and skulls were picked out in an ivory colour before these were washed and given a highlight with the original colour again. Weapons were painted black, to represent an exotic jungle ebony wood and highlighted grey. Shields, saddles and standards were painted deep red, washed in brown ink and then highlighted with a bright red that is somewhat translucent and thus merges in well.

Gold was represented by Vallejo Brass, with a brown wash over it - there is plenty of bling on these guys.
I completed the figures with a fine sand base and electrostatic grass and tufts.

With a Squirrel point for a new subject matter, I believe that this takes me to 8 Squirrels.


AHPC XII : From Mike W - 28mm Zombies #4 and Survivors

At the risk of getting boring, I'm still plugging away at my zombie horde, but light is at the end of the tunnel, this week sees the end of my collection of Zombicide figures. 

A cross section of the latest Zombies in the horde, centre is a ballerina,
flanked by two walkers on the left and two runners on the right

Next week I'll move on to the first of some Warlords Project Z figures and some other generic odds and ends figures in my collection waiting to be painted, another 50+ figures, that I'll split these into a couple of posts, then hopefully I'm done. Well maybe - I'll still keep an eye out for a few character figures as they become available

Another group with a Zombie bride, second from left

By way of variety this post also includes a few Survivors, again these are Zombicide figures. Now whilst I love their Zombie figures, in my opinion the jury is still out on their Survivors. Mainly because I have very few of them and their expense is discouraging me from getting more. What I do like is that for most Survivors you can also get a Zombie version of the figure, in case they fall to the deathly curse....

The third set of zombies, just four here! Second left is an old lady with her cats.
Both lady and cats are now zombies

So this Zombie batch has a number of Fatties in it that by their nature are bigger models and I have thus been spending more time on completing these to a standard that I'm happy with. There is also the Abomination group of five individual figures, on one base - any resemblance to a well known 1970s Disco group is purely intentional!

Two Fatties, left a girl in a unicorn Onesy - which was really fun to paint and right a Wrestler

Each figure was given a white undercoat, skin tomes applied as previously described and clothing added as appropriate.

Rear view of the Fatties

Various washes were used to add grime, shading and blood splatter for such a gruesome group, before basing  on a relatively plain grey concrete sidewalk.

A good view of the Biker, the Cop, the Cowboy and the Construction Worker

The Soldier with the Construction worker behind

Another view, I assume Felipe Rose (the Native American)had already
'Gone West' when the band fell prey to the Zombie scourge


The 'Greenwich Crew' Abomination was difficult to get completed, the figures are so intertwined and the model is supplied as is, so painting one guy almost always meant causing problems on one of the others. Of course it didn't help that I wanted to be 'Historically Accurate' in their outfits and when I checked the internet for reference material, a lot of it was contradictory...

Five survivors, albeit two are the same model painted differently!
I usually avoid green bases but here they denote living game pieces - easy to spot at a glance

I settled on what can be seen...

Monday 24 January 2022

AHPC XII: From Mike W - 28mm Norman Foot

 As I start writing-up this post (Sunday evening), I'm not sure if I'll make the cut-off for Monday 24th January, I've just varnished 47 of these little chaps and still have to apply the shield art and then base and photograph the outcome!

All 47 of the little Norman blighters! Finally finished in eth nick of time.

I think I bit-off a little too much to chew this week, what with the mounted Normans plus the Zombies all jostling for priority to get completed. 

First batch of five Norman Foot

More Normans...

So here are 47 Victrix Norman Foot, for a description on how these were painted I'll refer you back to my previous post on the Norman Cavalry! Exactly the same process here but no horse flesh. I'm reasonably pleased on how these turned out, they will greatly bolster my Norman forces for the Battles of 1066.

A group of largely unarmoured Normans, the guy on the right has leather armour

A group of chain mail clad Normans

There are 19 chain mail armoured guys here, 12 in Leather armour and 16 unarmoured guys, the majority are armed with a spear although the rest have swords, axes or maces as their primary weapons, each carries a kite shield.

Yet another batch of Norman Foot!

... and more. I really like the Victrix figures, more detail than the Conquest Games version of the same,
that said they are probably a little less robust on the gaming table!

So as it happens - I literally completed these little guys 20 mins before a self imposed deadline of mid-day on Monday. Hopefully they'll meet the posting schedule! Note to self - after all by blabbering about preparation in my last post - pick a sensible number of figures to paint in one batch. 47 is probably too big!!

Four more Norman Foot
Another five...

Another five!

The last three Normans

And lastly a quick video of all the figures on the workbench.


AHPC XII: From Mike W -

 I was recently asked the question as to how I am able to paint so quickly, to a seemingly reasonable standard, I'd never really thought about it before but I guess its equal parts preparation, technique and determination! That and employing slight of hand to get people not to look too closely at the figures 😀

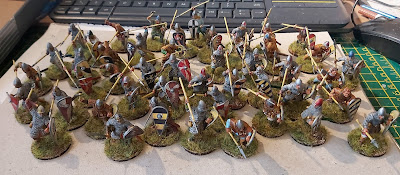
The whole completed group of 20 Norman Knights

When I look at the output of my fellow club member GrahameH - I'm staggered at what he can achieve, and they do look good close-up!

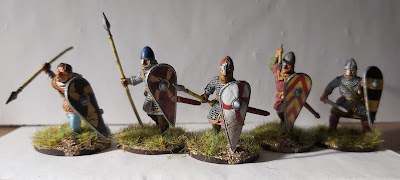
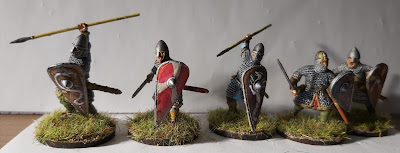
Half the group in line...

Thinking about Technique - this can be learned and that is down to hours of practice and trying out ideas as well as these last few years watching YouTube videos on how other people do it and then putting my own spin on it. That's why I try and talk through how I paint figures in these challenge posts - so that in my own little way I can share what I've learnt over the years. That sounds a bit pretentious - sorry.

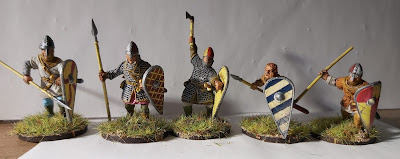
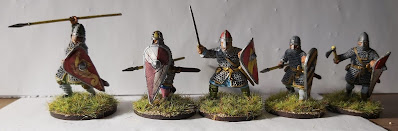
... and the other half. Ooops! I just noticed I missed out the guy with the round shield!

Preparation is key - this year I took the time to build models and then undercoat them prior to the challenge starting, leaving me with many figures that are just ready to go - paint wise. I have also digressed from my usual white undercoat a couple times, case in point being these Normans (and a batch of Norman Foot - also in progress). For these I undercoated them with a light grey primer (For UK readers - Halfords own brand car spray paint). Part of the preparation is to fix the undercoated figures to their bases and to check that I have the right paints at hand to complete the job.

Sunday night, 20 undercoated Norman Knights, fixed to MDF bases and spray painted in silver

The other part of preparation is that I have multiple batches of figures on the go at all times, so that when I reach a pause in one group, I can switch my attention to another group - maximising my hobby time and allowing paint, varnish and basing materials to dry properly.
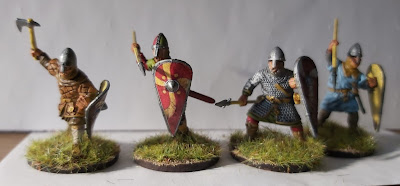
There he is!

The final part is the determination to just keep slogging through the figures until done....

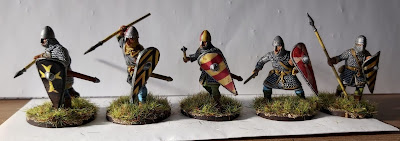
... Oh and I mentioned 'slight of hand', by that I mean highlight the bling - I use a bright brass on sword hilts and belt buckles etc. In these Dark Age figures that works well, on modern camouflaged figures its not so appropriate. So for these figures I also use colourful shield and banner designs too catch and distract the eye. By basing the figures well, such as adding tufts and the like, the eye is then distracted. It works well on wargames units but for character figures you just have to put in the time!

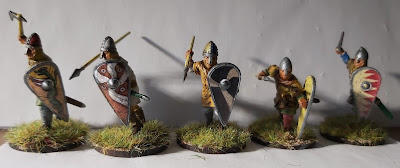
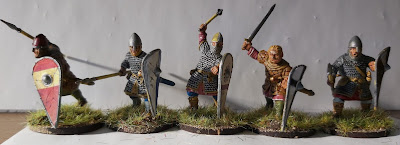
Another smaller group, lots of banners, shield art and colourful helmets always look good!

I started this batch of mounted figures on Sunday, separating out those that are armoured and spray painting these with Army Painter Silver, leaving them to dry over night.

Monday morning was the time to get the main colours blocked in, starting with the horse flesh, I limited myself to four main colours - Black, Dark Brown and Chestnut and pale Brown, plus one White / Grey horse. By the time I got through batches of these horses, I was then able to go back to add black mane, tail and lower legs on most of them. I gave a couple of horses lighter manes & tails for added variety.

I got these guys from eBay in a lot of pre-constructed models,
some had their moulded banners cut off but after a bit of work they look OK
as 'furled' instances of the same.

After lunch I returned to the horses to add white socks, and blazes to their faces and to dry brush the grey horse, so that it was predominantly white in colour. Next All reins, harnesses and straps were added - again in batches of colours, selected at random from the figures. Horse blankets and saddles were then added.

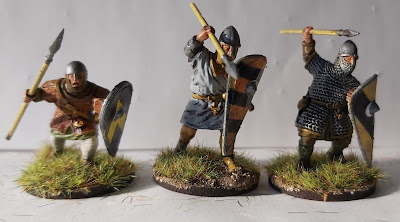
Another five little chaps, musician to the right

This is where determination began to come into play, the rider's spear staffs were coloured in, tan leather details for the back of shields and footwear and belts was added and finally for the day sleeves and leggings were blocked in with a random selection of figures from another limited palette of colours for these detail,

All figures were left overnight and on Tuesday I went back to fix all of my previous mistakes (many!) and to add details such as sword hilts, buckles on bridles before starting with coloured washes. Army Painter Flesh Tone on all flesh areas (obviously) but also on the lighter horseflesh. Strong wash on most other figures but Dark Tone on all metal work and bark brown and black horses. A watered down dark wash was used to highlight the Grey.

A view of the whole group from their right side - displaying shield art!

Figures were left to dry, with a view to apply Matt Varnish on Thursday, this was to allow me time to double check for any remaining errors / mistakes with a fresh eye and then fix them. Varnish will be allowed a day to dry and on Friday I completed the base work. 

For this purpose I have a tester pot (225ml) of dark brown emulsion paint, to this I have added new paint as the pot runs low along with quantities of PVA glue. The pot is the best part of 7 or 8 years old now and the gloop in it is pretty grim, but it paints onto any base and sticks! I then add fine sand and electrostatic grass & tufts to task!

And a view from the left, showing the horse flesh.

Wednesday saw me start the process over with the Norman Foot, some 40+ Victrix miniatures that I also undercoated and sprayed at the weekend. Yet another post of Zombies are in the workbench as well, hopefully for another bumper week next week. I'm thinking I may have bitten off more than I can chew with the Norman Foot, so their chance of completion is touch and go for next Monday.

The aim will be to slow down a little after that and concentrate on fewer but more detailed units etc for the rest of the challenge but hey, I may get distracted again!

Finally a video of the figures with a sneaky peek at  a one-off 15mm model of Captain Nolan of 'Charge of the Light Brigade' fame at the end!