Showing posts with label Vikings. Show all posts

Monday, 18 March 2024

AHPC XIV: From Mike W - 28mm Dark Ages, 15mm WW2 and other items!

 I was scratching my head about what to paint this week until a friend of mine, Dave from the Wargames Club, said that he had some old 28mm Gripping Beast Dark Ages (Vikings & Saxons) figures that he no longer wanted! Great I thought and I have now completed 32 of these guys!

The completed Dark Ages figures

Dave gave me the figures on Friday evening, so I spent the weekend putting these together and then undercoating them. About 20 of these guys were still on the frame, whilst the others were partially assembled requiring finishing off. With the plastics were a few metal figures, some of which I will present in this group, the others will likely follow-up in next week's post.

The two metal figures that were part of this group

Close-up of five of the figures, all with kite shields and all with Victrix Norman Heads

I wanted to assemble some of these guys as Bretons, so I used some spare Norman Hreads (Victrix & Conquest Games) and shields to give the figures this flavour, and used Breton artwork on the shields. In my mind these Bretons would be heavily influenced by the Normans but might retain some more generic features found in many Dark Age armies of the time. 

Four more of the guys, again with kite shields

Another five, all with round shields with Breton artwork.

These figures will be added to the 'Norman' pool for an upcoming game that I'll be staging recreating The Battle of Hastings,  at the club in coming months.

Next five figures, again wit Breton shields but the guy in the middle definitely has a Viking look! To his left there is a guy with a Oathmark human head with a hood and a cloak from the bits box

Painting was pretty straight forward, undercoated in grey with a white dry-brushing over the top of this. I used GW DarkOath Flesh for skin tomes and then highlighted this with Army Painter Barbarian Flesh. A point to note here is that the Dark Oath Fresh needs to be applied over a solid white undercoat, else it can look very dark, something for me to remember next time!

Six more figures

Chainmail and steel was done in GW Leadbelcher and various colours were used to 'dress' the figures, before applying a watered down dark wash to add shading. Wood was painted in Light Yellow, washed with watered down Soft Tone ink to give shading.

Last five figures, the standard is from the spares box, not Breton but looked cool

All were finished with a matt varnish and shield artwork was applied before baseing.

Next off the production line are 40 x 15mm Afrika Korps figures, I'm not sure of the manufacturer of these but suspect that they are old Command Decision figures - they're metal and have square cut bases - unlike the older Flames of War metal figures.

I use Flames of War basing sizes so here we have 8 bases each with 5 figures

Another view of the finished figures

These were all undercoated in grey then dry-brushed white, flesh was added using Army Painter Barbarian Flesh, uniforms were a mix of greens trying to replicate the German WW2 Tropical Green colour. Riles and machine guns were done in natural colours and belts etc done with brown leather. 

On random helmets, gas mask containers & water bottles I used a sand coloured paint to help give the figures a more desert feel. All was washed with a dark tone and varnished.

Close-up of some of  the figures, all rifle or MP40 Sub-machine Guns

Another close-up of the figures

Bases were finished off with fine sand and dried grass tufts.

And a very close view

Finally this week I have some 10mm English Billmen for my Flodden Project, these have been painted up as Lord Surrey's retinue, with red hose and green and white halved jackets. I have given each of these figures a leather / quilted jack and they sport either steel helmets or caps of various colours.

Six bases of ten figures in line of march, flags sourced from the internet

In a 3 base wide, 2 bases deep formation with standards to the front.

Again I have made this billman unit double sized with six bases instead of 3, as per WarMaster standards, each base with 10 figures. These tiny guys only get three flags in the unit as there are no suitable figures to convert to standard bearers! I had to press gang some spares into service here, something I'll need to sort out as I expend these armies, as I like a lot of flags in these type of units!

Unit in formation, with standards to the rear - as I prefer them to be on tabletop

And a view looking down on the unit.

Again time was a bit of an issue this week, so I didn't get everything finished that I'd hoped. There are some 10mm Flodden Horse nearing completion for next week, along with more Warlord Epic units, maybe even some more naval stuff if I have time to do the rigging!

Saturday, 13 January 2024

Friday Night Games - Battle of Stamford Bridge (Week Two)

Week Two of the battle saw the usual change in commander assignments, according to player availabililty. The Anglo Danes were again lead by John, playing Harold Godwinson, alongside Phil who continued playing Edwin of Mercia and they were joined by Steve who took on Mocar of Northumland's command.

On the Viking side the leadership team remained unchanged, with Rupert playing King Haraald, Dave playing Tostig Godwinson and Mat plating Eystein Orri.

The procedings picked up from the end of Week One, with the Ango-Danes engaing the Vikings along the length of their line. I'll leave the photos to explain this set-up.

Early on Week Two, on the extreme Viking left flank, a unit of Huntingdon Mounted Selct Fryd battles with Eystein Orri's Bondi and Archers, the horse is forced to retire and they stay out of the fight there onwards

Opening moves on week Two see Steve replace the mounted Slect Fryd with infantry units in the attack on the Viking left flank. What had seemed to be a staright forward task was complicated by the continued arrival of units belonging to Eystein Orri on that flank.

Luckily for the Anglo-Danes the cramped positions on that flank, left little room for Orri to deploy his men to greater advantage and as time progressed the rolling collapse of the Viking left flank gave all Viking commanders increasing cause for concern.

Bottom left we can see Harald Haraada and his bodyguard in the front line fighting the advancng Anglo-Danish Wessex men. To Harald's right are a unit of Hirdsmen, both are fighting Wessex Select Fryd.

A small unit of Berserkers have caught an Anglo-Danish General Fryd unit in their flank, these unfortuneate Frydsmen are also facing Viking Hirdsmen to their front.

On the Viking right units from Tostig Godwinson's alliance of English rebels and Viking allies were in trouble, hard pressed by Harold Godwinson's Wessexmen. after an hour or so of fighting Tostig fell, quite possibly to the axe of his brother Leofwine - but confusion in the battle and passage of time have blurred the memory. For certain each brother was in the frontline fighting each other.

To the right of Harald Haraada's position we we can see Tostig Godwinson with  his bodygaurd and Hearthgaurd fighting in the line, with allied Frankish spearmen to their right. They are facing Wessex Select Fryd and Housecarl units

With Tostig' death and the gradual crumbling of the Viking flank, the overall Viking postion became more and more difficult, yet Harald and his men held on. Even the remnants of Tostig's Hearth Guard surrenedered when facing the overwelming odds but Harald fought on.

Later Eysein Orri, slipped away from the battle, (well Mat had reached his curfew time!) with a view to readying the fleet and allow Harald to get away.

Disaster strikes to the extreme right of the Viking line when one of the flanking mounted Select Fryd from Huntingdon are able to force the defendng Enlish Rebels, under Tostig Godwinson to retire. The horsemen follow-up and catch the foot and inflict even more casualties, turning the retirement into a near rout. Centre can be seen the mounted figure of Earl Waltheof of Huntingdon.

A view along the battle line, from the Viking left to their centre right, in the center we can see Earls Wlfred and Earl Godfred of Auchenforth, both sb-commanders under Earl Morcar, leading the fight against Eystein Orri's Viking re-enforcements

In the end Harald and his battered forces spotted a lull in the fighting and used this to order his men to withdraw in an ordered manner, heading back to Ricall to board their ships and return to Norway and lick their wonds.

Harold Godwinson, seeing this did not persue, knowing that he had other battles to fight - possibly in the very near future!
Back on the Viking right flank,  after Tostig's death and the loss of the English Rebels, the unit of Scots spearmen is cut-off and surrounded. The Scots, seeing that they are totally outnumbered and face slaughter - lay down their arms and surrender.

The continuing collapse of the Viking left flank is caught here in this photo.

Next outing we'll see the entry of William of Normandy and his allied forces at Hastings, looking to enforce his claim to the English throne. Will the Godwinsons prevail or will the battle go the way of history. Stay tuned  to find out!

Saturday, 6 January 2024

Battle of Stamford Bridge, 25th September 1066

For the first Friday game of 2024, Mie W staged a refight of Battle of Stamford Bridge in 28mm. The game was hosted at Rupert's and th e rule set was based upon Peter Dennis & Andy Callan's '1066 and all That'.

This game is a follow on from the relatively recent refight of Fuford Gate (see here), in thet the Anglo-Dane & Viking forces were impacted by the losses that they recieved at that earlier meeting.

Anglo-Danish orces pour over Stamford Bridge after making short work of the one 'heroic' Viking.

As such the Viking forces under Harald Hararda and Tosting Godwinson were reduced but not devistatingly so, the only big change being that Jarl Gnvald the Bald had been slain at Fulford Gate and thus his small force was no longer available. Instead the Vikings could call pon their reserves under Eystein Orri, located some 12 milies from the battlefield.

The Vikings were played by Rupert (Harald), Dave (Tostig) and Mat (Eystein Orri), whilst the Anglo-Danes were commnded by John (Harold Godwinson), with the able help of Mark, Mike N (Earl Morcar's Northumbrians) and Phil (Earl Edwin's Mercians).

First stage of the game was the fight to cross the bridge, a lone Viking Hearthguard stood wealding a double handed axe, unlike the historical ledgend, Harold ordered his bowmen to open fire nad teh unfortunate Viking was cut down in a hail of arrows without creating his own ledgend!

The Second stage of the battle was the Anglo Danes marching to deploy in to line of batte, Harold deployed to the left and centre, with Morcar deploying to his far right and Edwin to his immediate right. On each flank were depoyed independent Anglo Danish horsemen, threatening the Viking flanks, forcing their right flank to refuse their line to protect themselves.

The waiting Vikings begin to line-up on the slope northe of the River Derwent

The Vikings had started the game with just Harald and Tostig on the tabletop, accompanied by their bodyguards and Heathguards. During the course of the long Anglo Danish deployement process, they were able to bring additional units onto the field to bolster their lines. Harald was linng up in the centre and left, whlist Tostig was to his right.

The Anglo-Danes doing the same after crossing the bridge.

The Anglo-Danes slowly begin to close on the Viking lines.

Stage Three - the Angle-Danes advanced into contact on their left, with John keen for the fighting to begin. As this was happening Eystein orri's troops began to arrive on the Viking extreme left, a turn or so later Morcar and Edwin's men also engaged along the line, aincluding lead elements of Orri's troops.

Another view of the waiting Viking lines

The Anglo-Danish line as it advances.

Close-up of the Anglo-Danish Horse

Another shot of the Anglo-ane lining out after crossing the bridge

Friday, 4 August 2023

Vikings and Saxons, 3D Printed figures

This week I was able to work through a set of 3D Printed figures that I acquired off eBay. They were listed as Vikings and Saxons and were a pretty reasonable price, the sets were Viking Berserkers, Dark Age Slingers and Saxons, 24 figures in total.

The Saxon set

Now on arrival and looking at the figures I was a little disappointed with the quality of the sculpts, of the 10 Saxon figures, there were only a couple of stand out figures - the commander, pointing and the standard bearer. That said after painting the figures - they will all look OK, en masse in a suitable army.

These Saxons are definitely not 'historically' accurate, with somewhat suspect chainmail designs.

My biggest criticism of these Saxon fellows is that they are not historically accurate - they are definitely a fantasy version of a Saxon warrior, with significant embellishments to their chainmail shirts. It is once you start painting them that you realise the limitations of the sculpts and the poor definition on the faces and other details.

The remaining Saxons in close-up

Not showing very well in the photo is an attempt to print a flag design on paper and then attach to the moulded flag, concept good, execution leaving a little to be desired!

As noted the Saxon commander was a nice figure but looking at the above rear view it is very doubtful that a Saxon warrior would be a carrying a two handed sword as depicted on the model.

Victrix Housecarl

By way of light relief I had found a Victrix Housecarl hidden in the clutter of my work desk, so I felt I had to paint him up, He'll be joining his friends to fight the Vikings at Stamford Bridge in December!

Next up was a group of six Dark Age slingers, these were relatively few and far between in the battles that I'm interested in playing but the figures supplied here looked interesting. All my comments about the Saxons from above apply to these!

I placed most of these figures on a multi-base,
the unit included two female fighters and I painted these accordingly -
representing a unit made-up of old and young alike with 

Another view of the slingers

Finally we have the Viking Berserker figures, these all painted up nicely despite sharing mainly of the concerns I had for the Saxon figures. These guys are all bare chested and carrying axes, swords etc. As all of these had acres of bare flesh exposed, I painted them with my usual Army Painter Barbarian Flesh and then used Flesh Wash to add muscle definition, this worked pretty well on all figures.


8 x Viking Berserker figures.

Some nice figures in this set - the Standard Bearer is again somewhat fantasy in origins but the overall feel of these fierce follows seems to have come through. 

The shield was added to a figure that had lost it's arm in postage
and it nicely obscures the missing parts.

Overall, not a waste of time and money but the figures do have some challenges, these chaps will be joining their brethren for the 1066 Campaign.

Sunday, 30 July 2023

Battle of Fulford Gate, Part 2

Moving on from Week One, we had change n personnel, as the waring commanders took breaks (holidays actually!), leaving us with the following players on each team.

Vikings -  Rupert (King Harald), John (Tostig) and Dave (Jarl Gunvald) all ably aided by Mat
Anglo Danes - Steve (Earl Edwin), Phil  (Earl Moncur), helped by Mark

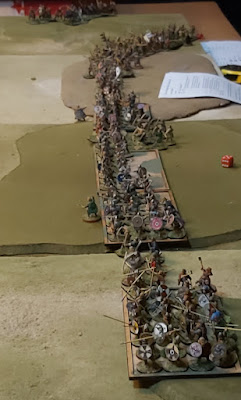
The situation at the start of Week Two, conflict along the river line with all to play for...
Harald's troops nearest camera with Tostig's contingent and then Jarl Gunvald.

Fighting was intense with each side taking casualties, the Anglo-Danes, defending the river line held back the Viking Bondi & Hirdsmen, leveraging their advantage their defensive advantage. But, cunning old fox, Harald, realised that the trick in cracking the Anglo-Danish shield walls was to exploit his crack troops - learning from the exploits of his Berserkers he then committed his Hearth Guards to attacking the enemy lines with their two handed axes.

Immediately he started to see success and this was picked up by Tostig and Jarl Gunvald who committed their crack troops to the attack as well.

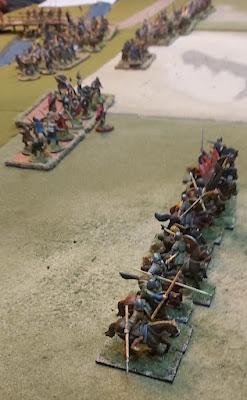
Tostig's Hearth Guard, punishing the extreme left wing of the Anglo-Danish line - held by Mercian General Fryd, who were unable to stop their assaults.

Soon both winds of the Anglo-Danish Army were in trouble, Earl Edwin's left flank, held by General Fryd, were being mauled by Tostig's Hearth Guards, eventually they cracked and retreated. Leaving the ford uncontested.
Earl Edwin's Housecarls, rushing to re-enforce the left of his line, eventually engaged with Tostig's Hearth Guard, trying to recapture the ford, but to no avail as night-time arrived too soon.

On the Anglo-Danish right flank, a contingent of Housecarls had been strengthening the flank and doing good work. However at the Bridge the Berserkers had continued to do their work, disrupting the shield wall and fighting to the death. This allowed Harald time to deploy his Hearth Guards along the same part of the river bank and finally the two Fryd units (one General & one Select) gave way and routed. leaving Harald in control of the bridge.

Nip and tuck in the centre

In the centre the fight continued to be very close fought, with neither side gaining any huge advantage, Anglo-Danish advantage in holding the defendable river line being offset by better quality Viking troops and some unfortunate dice throwing.

With one turn to go, disaster struck Earl Edwin's forces, both of his sub-commanders were struck down in personal combats, whilst this had no immediate effect it meant that the good Earl Edwin was left with an initiative disadvantage and a lack of field commanders to help save any vassalating units when they were morale tested.
On the Anglo-Danish right, Vikings take control of the bridge,
as English units retire from the fight

So as night fell the umpire declared a marginal victory for the Vikings, who had taken both the Bridge and the Ford and had a number of units north of the river. The Anglo-Danes had fought well, holding their own for most of the day, until mounting casualties took their toll.

This periodic campaign will now move on to the Battle of Stamford Bridge, historically fought just 5 days after Fulford Gate but in wargames terms will now be scheduled for December!

Casualties taken by both sides will be factored into the Order of Battle for Stamford Bridge, whilst both side can expect to receive re-enforcements - on the English side the arrival of King Harold and his Army and on the Viking side the arrival of more supporters and Harald's reserves.

Finally the map from the game that may be of interest to our viewers / readers!

Table-top Map, English deploy on village side of the river,
Vikings deploy on the sloped side of the table

Saturday, 22 July 2023

Battle of Fulford Gate - Battle Report - Week One

Week One of the Battle of Fulford Gate was hosted by Rupert and involved 28mm figures from Mike W's collection. Mike W, also developed a set of 'Quick & Dirty' Dark Ages Rules for this series of 1066 gates.

On the Viking Side we had Rupert, Mat and Dave commanding Harald Harada and Tostig Godwinson' arrays. On the side of the English we had Steve, Mike N, Phil and Mark commanding the armies of Earls Edwin and Moncur.

The number of figures on each side was somewhat similar but the Vikings had generally better quality troops, albeit that their Victory Points required them to establish a foothold north of the river by the end of the day.


The Anglo Danish Armies, from the Western flank,
Earl Edwin's Mercians nearest the camera and Earl Moncur's Northumbrians in the distance.

Both sides had a command conundrum to solve before deploying their troops, the river over which they would be fighting was tidal and so they had to select a game turn in which to start the game with this in mind. Additionally the English side was tasked to hold the river line as long as possible, whereas the Vikings were marching on to the battle field and would want to start the game as early as possible.


Vikings of Gudbald's command (part of Tostig's motley array oy of allies & supporters)
lead an attack on Edwin's Fyrd on the western flanks.


After initial deployment - as it happens both sides elected to deploy as early as possible on turn one - the sides marched forward to the river line. The English reached the river line first and there set-up a shield wall along the length of their line.

Vikings from Tostig's division, heading north, come off the slopes and head towards the English lines on the river, hoping to cross at the bridge and ford locations.

Gudbald and his troops where the first to make contact with the English in and around the western marsh areas but the fighting was inconsequential and was to continue for many turns. To the East,  Moncur's forces closed and engaged with a Bondi unit initially attempting to force the bridge, only to be stopped by their English adversaries.

English Archers in the marshy are a to the west of the battlefield.

Harald reacted quickly as he was in the vicinity of the bridge attack, realising the Bondi unit was not suitable to succeed in such an attack he pulled them back and fed in his Berserkers instead. These proved much more effective as they began to cut their way through the defending General Fyrd.

The battle lies from the eastern point of view, with Berserkers attacking across the bridge 

The game reached a natural break-point, to be continued next week - there was now fighting all long the line with Viking units crossing the river and flinging themselves against the English shied walls

Detail of the bridge fight, with King Harald and his bodyguard, personally directing the attack


In the centre, Viking Bondi,
crossing the river to spread the happiness to two English units - one General he other Select Fryd

Final view of the Bridge battle, with the Berserkers pushing through the opposing Fyrd
but at the cost of casualties to themselves.


Week Two to follow soon!