Tuesday 24 July 2012

Drummossie Moor – April 16, 1746


"What cutting and slicing there was" - Donald McKay of Acomnie

The Armies and their dispositions…

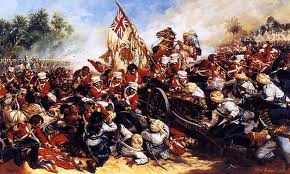
On 16 April 1746, an army under Prince Charles Stuart met an army of his cousin, William, Duke of Cumberland, on a moor outside Inverness. The last battle fought on British mainland soil was not, as is commonly understood, between the English and the Scots, but between the British government and Jacobite rebels. More Scots fought on the government side than fought for the 'romantic' Stuart cause. The battle proved rather one sided as the experience government troops out-thought and out-fought the tired Highland clansmen.

To make the re-fight of the battle a little more interesting each side has a number of options laid out in it’s briefing, these relate to a number of plausible what-ifs that have been well documented over the years.

Orders of Battle:

The Jacobites
Hanovarians
Front Rank:
1.   Atholl Brigade
2.   Cameron of Locheil
3.   Appin Stewarts
4.   Frasers
5.   Lady McIntosh’s Regiment
6.   Farquarsons
7.   McLeans & McLachlans
8.   John Roy Stuart’s Regiment
9.   Clan Ranald McDonalds
10. McDonalds of Keppoch
11. Glengarry McDonalds

2nd Rank:
1.   Fitzjames’ Irish Horse
2.   Gordons
3.   Ogilvey’s Regiment
4.   Drummond’s Royal Ecossais
5.   Irish Piquets
6.   Glenbucket Regiment
7.   Prince Charles’ HQ
8.   Strathallen’s Horse Guards
9.   Kilmarnock’s Horse
Front Rank:
1.   Barrell’s 4th Foot
2.   Munro’s 37th Foot
3.   Campbell’s 21st foot
4.   Price’s 14th Foot
5.   Cholmondeley’s 34th Foot
6.   St. Clair’s 2nd Battalion, Royal Regiment of Foot
7.   Pulteney’s 13th Foot
8.   Cobham’s 10th Dragoons
9.   Kingston’s 10th Horse

2nd Rank:
1.   Sempill’s 25th Foot
2.   Bligh’s 20th Foot
3.   Ligonier’s 59th Foot
4.   Fleming’s 36th Foot
5.   Howard’s 3rd Foot
6.   Battereau’s 62nd Foot

3rd Rank:
1.    Blakeney’s 27th Foot
2.    Duke of Cumberland’s HQ
3.   Coehorn Mortars
4.   Kerr’s 11th Dragoons

Flank:
1.   Wolfe’s 8th Foot
2.   Argyll & Campbell  Militias

Jacobite Officers
Hanovarian Officers
Name
Rating
Name
Rating
Prince Charles Stuart C-in-C
Colonel O’Sullivan 2-in-C

Front Rank (Right/Center/Left):
Lord George Murray
Lord John Drummond
Duke of Perth, James Drummond

2nd Rank: (Right/Left):
Lt.Col Walter Stapleton
Lord Louis Drummond

Plus One
Minus One


Plus One
Neutral
Neutral


Neutral
Neutral
Duke of Cumberland C-in-C

Front Rank:
Earl of Abermarle –

2nd Rank:
Maj-General John Husk

3rd  Rank:
Maj-General Mordaunt 

Plus One


Neutral


Neutral


Neutral


Jacobite Options

The Jacobite forces start the game with 25 Points in the bank, this is added to basis the results of the random event generator!

Points can be spent as follows:

1 point per additional Rebel Infantry Stand brought onto the field, upto max of 20.
2 points to demolish 6” of enclosure walls.
2 points per gun to convert Artillery Scratch crews to French Regulars.
2 points per additional Royal Ecossais, upto a max of 3 additional stands.
5 points to place the McDonald regiments on the right of the line, requires Murray to be 2-in-C
10 points to use Lord George Murray as 2-in-C instead of Col. O’Sullivan.

Additional Rebel Stands
To represent that fact that much of the Jacobite army was in disarray after the abortive night march on Nairn with it’s exhausted troops returning to their billets at about 6 o’clock in the morning. During the morning of the battle troops that had rested returned to the field in dribs and drabs.

Each turn throw 1d6, that number of stands may be added to any deployed Jacobite unit on the field.

Restrictions:

  1. No more stands than the total paid for may be returned to the field.
  2. No Jacobite unit may contain more than 6 stands maximum.
  3. Once battle commences (i.e. Jacobite move forward) no new stands may be added to any deployed unit.
Demolish Enclosure Walls
It was widely assumed that the Jacobite army would have demolished the enclosure walls that restricted their flank movement, preventing them from attempting to outflank the Hanoverian lines. (In fact Lord George Murray requested permission to do this from the prince but was refused).

For each 2 points spent 15cm of wall can be demolished.

Restrictions:

  1. All stretches of wall to be demolished must be done so prior to start of first Jacobite movement phase.
Convert Artillery Scratch Crews to French Crews
The Jacobite army contained a number of trained French Artillery crews to serve it’s guns, one such crew arrived late on the field of battle. Other crews had billeted in Inverness after the night march and did not make it back to the battlefield in time.

For each 2 points an additional gun can be converted to have French crews, throw 1d6 to determine the number of crews that arrive on the field, starting turn, each time a 5 or 6 is thrown a French crew arrives and immediately replaces the existing scratch crew.

Restrictions:

  1. No more crews than the total paid for may be returned to the field.
  2. Once battle commences (i.e. Jacobite move forward) no new stands may be added to any deployed unit.
Additional Royal Ecossais Stands
The Royal Ecossais were garrisoned at Ruthven barracks, but had been requested to meet with the army at Drummossie Moor, however, they failed to reach the battlefield in time.

Each turn throw 1d6, on a throw of 5 or 6 the paid for number of Royal Ecossais stands arrive immediately and join their companions.

Restrictions:

  1.  Once battle commences (i.e. Jacobite move forward) no new stands may be added to any deployed unit.


McDonalds Stand on the right of the line.
The McDonalds believed that that had earned the honour to stand on the right of the battleline, at Colluden O’Sullivan ordered that they were should be deployed on the left and felt slighted by this positioning.

If this option is selected then the McDonalds are restored to what they believe is their rightful position on the right of the line, all other units move to the left accordingly.

If placed on the left of the line the McDonalds will have a -1 dice adjustment when receiving orders through-out the game, if on the right then they have no such penalty.

Restrictions:

  1. If this option is selected then the McDonalds must be deployed on the right of the line prior to first Jacobite move of the game.
  2. To select this option then the Jacobites must also select to have Lord George Murray as 2-in-C.
Lord George Murray as 2-in-C
Lord George Murray, although deeply flawed,  was the best military mind in the Jacobite Officer Corps, he understood what the Jacobite troops could do and how they should be handled. However, he had only ever held junior rank in his prior military carer.

After the failure of the night march on Nairn, Prince Charles preferred to take the council of Colonel Cornelius O’Sullivan, an Irishman in French service, who though an excellent organiser, was used to dealing with regular troops and not the strong willed highland clansmen.

If this option is selected then the Murray retains his position as trusted advisor to Prince Charles, Colonel O’Sullivan is dropped from the list of available Jacobite Officers. The Jacobite Front line will then be split between the Drummond brothers, Murray will operate at his published Plus One command bonus.

If option is not taken then Murray will operate at a Neutral command bonus level, commanding the right flank of the Jacobite front line.

Hanovarian Options

The Hanoverian forces start the game with 25 Points in the bank, this is added to basis the results of the random event generator!

Points can be spent as follows:

1 point per stand to increase regular infantry battalion Strength from 3 to 4, to represent increased training. (e.g. A battalion of 4 stands costs 4 points, all stands mush have same strength).
2 points per additional Infantry Stand added to the 3 stand battalions to make them upto 4 stands each.
3 points per additional Horse/Dragoon Stand added to the 3 stand battalions to make them upto 4 stands each.
3 points to position a 6” wide broken ground / boggy ground template 12” from your front rank, to reflect the Hanoverian’s better choice of ground to fight over.
Increase Regular Strength from 3 to 4
To represent that fact that much of the Hanoverian army was given additional bayonet and musket training on how to deal with the Jacobite threat

Restrictions:

  1. All stands in the same unit must be increased to a strength level of 4, no unit may have a mixture of strength 3 and 4 stands.
  2. All units must be selected for training prior to the deployment of the army.
Increase number of stands in under-strength infantry units
To represent that a number of units were under-strength at Colluden but waiting for replacements from Aberdeen, the Hanoverian player has the option to bring these in early if desired.

Restrictions:

  1. No single unit ay have more than 4 stands.
  2. If unit is to be increased in strength from 3 to 4 then this has to be paid for for the additional stands separately.
Increase number of stands in under-strength horse / dragoon units
To represent that a number of units were under-strength at Colluden but waiting for replacements from Aberdeen, the Hanoverian player has the option to bring these in early if desired.

Restrictions:

  1. No single unit ay have more than 4 stands.
  2. If unit is to be increased in strength from 3 to 4 then this has to be paid for for the additional stands separately.
Boggy / Broken ground
Due to the speed at which the Hanoverian army approached Inverness, and poor scouting by the Jacobites, there was considerable areas of poor ground between the opposing armies that would impact the Jacobites’ ability to manoeuvre.

Restrictions:

  1. Each piece of boggy / broken ground must be placed working from the centre of the Jacobite line towards your right flank, only when this ground outflanks the Jacobite line can you place boggy / broken ground to the left of centre of the Jacobite line.
  2. All terrain pieces must be within contact with 10cm of their adjacent terrain piece.


Battle of Bothwell Brig' 1679

The Battle

The Covenanters established their camp on the south bank of the Clyde, north of Hamilton. The rebels numbered around 6,000 men but lacked discipline and were deeply divided by religious disagreements.
They had few competent commanders, being nominally led by Robert Hamilton of Preston, although his rigid stance against the ‘Indulged’ ministers only encouraged further division. The preacher Donald Cargill and William Cleland, the victor of Drumclog, were present, as were David Hackston of Rathillet and John Balfour of Kinloch, known as Burley, Hackston & Balfour were among the group who murdered Archbishop Sharp on 3 May.

The government army numbered around 5,000 regular troops and militia, and was commanded by James Scott, 1st Duke of Monmouth, he was supported by John Graham of Claverhouse and Viscount Linlithgow.

The battle centred on a narrow bridge across the Clyde, the passage of which Monmouth was required to force in order to come at the Covenanters. Hackston led the defence of the bridge, but his men lacked artillery and ammunition, and were forced to withdraw after around an hour.
Once Monmouth's men were across the bridge, the Covenanters were quickly routed. Many fled into the parks of nearby Hamilton Palace, seat of Duchess Anne, who was sympathetic to the Presbyterian cause.

Around 600 Covenanters were killed, while some 1200 were taken prisoner. Government losses are not known, though they took heavy casualties forcing the bridge at the start of the battle.


The First Sikh War battles

by Dave Vallance

Here's a rough outline to the 4 battles of the first war..1845-1846

Mudki - 18th December 1845 
first battle, Sikhs under Lal Singh (remember him?)
bump into Sir Hugh Gough's advancing force (now known as the Army of the Sutlej) near the village of Mudki ..British win (huzzah!) and 3rd Light Dragoons win battle honour for charging down the Sikh gun lines


Ferozeshah - 21st - 22nd December 1845
  
Lal, having been given a bloody nose, retires to the village of Ferozeshah, where he digs in, throwing up earthworks around the village, in a horseshoe shape. He realises that his troops cannot manouevre in the open as at Mudki as well as the British, , so from now on the Sikhs develop the tactic of throwing up earthworks etc, with their heavy artillery well placed, and await the British attack..this tactic is now the norm for the remaining battles..a Sikh fortified defence attacked head on by the British and Sepoys.

Anyway, Sir Hugh Gough wants to attack straight away, but he is reined in by the Governor General, Sir, Henry Hardinge, who although acting as a subordinate. insists that Gough waits for another team to arrive, under Sir Charles Littler, who has been bottled up in the town of Ferozepore (not shah) which is on the River Sutlej, the border between us and the Sikhs, and to the north of Ferozeshah.

 Littler has been bottled up by another Sikh army, under their C in C, Tej Singh, but Littler manages to get out during the night and joins Gough.

Gough attacks on the 21st , wins with a Phyrric victory, drives the Sikhs out, but as the water in the village has been contaminated by the Sikhs, he is forced to retire to his start lines to get food, ammo, water etc.. during the night, the sneaky Sikhs retake Ferozeshah, and start bombarding the Brits again with their guns that the Brits hadnt spiked etc.

Gough, wants to attack during the night, but is again reined in by Hardinge (yes there is an 'e' at the end of his name, its not a typo)

The next morning, Gough attacks again and retakes Ferozeshah in a hard fought battle...we win again (another huzzah!!). however we are exhausted, thirsty, tired (having been shot at all night by the Sikh artillery) and down to our last rounds..when....Tej Singh's army turn up!! Oh crap, we are in deep shittings! 

Off we go again...the knackered Army of the Sutlej stand too, realising that they've got to fight again against a fresh Sikh army...however, Tej retreats when he sees British cavalry heading towards the flank....remember the plan to destroy the Khalsa from previous mails? Tej realised that he could beat the Army of the Sutlej, but the plan is to have the Khalsa beaten..."treachery, treachery", is the cry from the Sikh soldiery..The Brits and Sepoys breath a big sigh of relief.....now there comes a 'what if?' What would happen if Tej attacked?

Could this have led to a general Indian uprising?

Aliwal - 28th January 1846 - 'the battle without a mistake'
well we won't be doing this game!

Another Sikh force under a Ranjoor Singh was trying to cut off our supply lines and Gough sent Sir Harry Smith to stop him, which he did (shall we have another huzzah?) at the village of Aliwal.

16th Lancers charge and break a Sikh regular infantry square, another battle honour

 Sobraon - 10th February 1846

By now the Sikhs had retreated back to the River Sutlej, this was
their last stand..again earthworks on a semi circle, their rear on the river itself with a bridge of boats going across, artillery on far bank proving support..another frontal assault, Gough by now had some heavy seige guns which he used effectively, but when told they were running low on ammo, his famous quote of "thank god, at last I can get at them with the bayonet" came about here. Once the lines were breached, by cavalry no less, and help arrived, the Sikhs headed for the river , some swimming, some trying to cram across the bridge which collapsed...now it became a turkey shoot for the Brits..the Khalsa was effectively destoyed and the remainder surrendered..the First Sikh war was over...

All of these battles were hard fought affairs, the British being surprised and impressed by the unanticipated courage and determination of the Sikhs. Many British officers thought that Ferozeshah was ' a very desperate affair'.. the Sikhs actually claimed it as a victory. If it was a British victory, then it certainly wasnt a decisive one. General Gough also admired the martial qualities of the Sikhs . He one said "Never did a native army having so relatively slight an advantage in numbers fight a battle with the British in which the issue was so doubtful as at Ferozeshah"

Check out Dave's excellent Sikh Wars Introductory article <here>

Saturday 21 July 2012

Battle of Neufchateau

Phil's game started on 13/07/12. French v Germans in the early days of WWI.

More Photos <Here>

Week One: 13th Jul 2012 - French (Mike W & Steve) versus Germans (Mike N & Rupert).

Week Two: 27th July

French Situation Briefing
The French Fourth army has just begun its advance into the Belgium Ardennes. Intelligence from the Belgium’s and the French cavalry of Sordet’s Cavalry Corp is that the Germans right wing has passed north of the Ardennes, and that only weak German forces are guarding the German hinge between their northern and southern army groups. The Objective of the French Fourth army is to smash the hinge and cut off the German northern army group.

The 5th Colonial Brigade, an independent brigade in the Elite Colonial Corps is marching independently on the left of the Colonial Corp with the 3rd Colonial Division to its right. The 12th Corp is to its left. The day’s march began with the crossing of the Semois River at 06.00, with the objective of reaching Neufchâteau by 10.30 hours for the days march.

French Artillery, from Phil hardy's collection
Within 1km of the Brigades start point, the lead troops in the advance guard are fired on by a German cavalry patrol. These promptly retire, but repeat this procedure several times at successive tree lines. The advance becomes very cautious with company strength infantry patrols sent out to check and clear tree lines and buildings. On approaching the bridge southwest of Neufchâteau at 11.40 hours, fire is received from a couple of buildings near the bridge, and a German cavalry patrol is seen to promptly leave. On crossing the bridge, the sound of wagons moving on cobblestones can be heard from the other side of the ridge to the north. The commander of the lead advance guard battalion sends an infantry patrol into Neufchâteau which receives heavy fire and an infantry patrol up onto the ridge, which spots artillery disappearing into the woods to the west, and a small group of resting German cavalry.

At 12.15 the Brigade commander receives a report that the advance guard is engaged by a superior enemy force. The lead battalion is outside Neufchâteau, the second battalion is resting at Grapfontaine.

French Doctrine and order of March 1914
Advance Guard
Divisional Cavalry squadron
1st Infantry Regiment (3 battalions)
Divisional Engineer Company 
Artillery Group (3 batteries, from the Divisional artillery regiment)
Divisional HQ + Artillery regiment HQ

Main body
1st Infantry Brigade HQ
French Infantry Advance
2nd Infantry Regiment
Divisional Artillery Regiment (2 groups each of 3 batteries)
2nd Infantry Brigade (2 Infantry Regiments & HQs)

There would be a gap of 2km between the rear of the advance guard, and the head of the main-body. The advance guard would march out approximately 1 ¼ hours ahead of the main body.

Doctrine
French doctrine required the advance guard to fight for information. On contacting the enemy it was to attack immediately, with the aim of forcing the enemy to fire and reveal his positions, strength and disrupt his deployment. If the enemy was weak the advance guard was to force him to retire, and continue the advance. The aim was to minimise the chances of a premature deployment of the main body and to keep up a rapid pace of advance.

Once the enemy’s main position had been identified the Divisional commander would deploy the massed Divisional Artillery regiment to dominate the key ground, and support the major infantry attack. In French doctrine, the artillery provided the fire and the Infantry the manoeuvre. Flanking manoeuvres of the enemy position were co-ordinated at the Corp or Army level, using the other Division in the Corp, or those of a neighbouring Corp. Within the Division the aim of the attack was to pierce the enemy’s position or force him to retire. As a Division would not be manoeuvring to its flanks, flanks were to be secured by detaching Infantry battalions to hold key terrain to the flanks, usually high ground.

French doctrine had recognized that it was the initial volley of artillery shells that did the most damage to the enemy (i.e. before he had taken cover), that artillery fire was naturally inaccurate and that a prolonged preparatory fire against an enemy in cover caused few casualties, and used a lot of ammunition. To maximise the effect of their artillery the French artillery would only fire once the Infantry had begun their attack, and the enemy had revealed himself by firing. The first target was the enemy’s artillery. Once that had been driven off the enemy’s infantry was engaged.

The theory was that massed French 75’s would be rapidly deployed forward to short range in the open to maximise accuracy and speed into action. Short bursts of intense fire were to be used to kill the enemy if he revealed himself by firing, or otherwise to neutralise him by forcing him to keep his head down, thus using ammunition efficiently. The principle was to seize and maintain the initiative by rapid concentrations of fire and men. The French 75mm field gun ‘system’ was expressly design to this doctrine.

Concealed or defiladed positions were only used if there was time and they were in convenient positions.

The artillery acquired targets either by sending an officer to liaise with an Infantry HQ it had been subordinated to by the Divisional commander. Or more usually the Battery commander would observe from the battery position or forward of it if the battery was deployed in a defiladed position behind a crest line. The Divisional commander would specify a part of the front the battery or group of batteries was to engage the enemy across. Targets would be engaged either as opportunity presented, or as designated by the Divisional commander based on information received from subordinates. Apart from the group of field gun batteries with the advance guard, all the other artillery remained under the Divisional commander at all times.

Corp level artillery was an artillery reserve used to reinforce the Divisional level artillery, and when done so came under the Divisional commanders control.

The town is contested.
Telephone communication was only used between the batteries of a group if there was time to deploy it. Sometimes it would be used to connect a battery commander forward of a crest line to his battery defiladed behind the crest. Main reliance was on observation from the battery position and runners.

In defense French doctrine proscribed a main defensive line, large reserves for counter-attacking, and strongly held forward positions, the purpose of which was to deceive the enemy as to the position of the main defensive line. The aim was to force the enemy into deploying his infantry into combat formations too early, waste time, reveal his plan of attack, and make his infantry vulnerable to French artillery fire. Enemy preparatory artillery fire would also be wasted on empty ground in front of the main position. The French would keep a large part of their artillery in reserve to be deployed as the main enemy attack developed seeking to smother it in massed artillery fire.

Machineguns were used to provided direct fire support for the infantry; they were deployed in over-watch or flanking positions.

Corp and Army level cavalry provided the main reconnaissance troops; Divisional cavalry squadrons provided only local security. 

Germans move in to the woods
German Situation Briefing
The German 4th Army began its march through the Belgium Ardennes 3 days ago. Its role is to guard the German 3rd Army flank. It is currently marching west, its component Korps echeloned back from north to south.

At 03.00 the 4th Army commander, Duke Albrecht of Wurttemberg has ordered 18th Reserve Korps (21st and 25th Reserve Divisions) to assemble at Neufchâteau and to prepare to march south.

At 10.00 hours the 21st Reserve Division HQ received a report from a cavalry patrol that a very strong French force was northwest of St Medard (west south west of Neufchâteau) heading north. To prevent the 21st Division from being outflanked the decision was taken  to march the 21st division west to Petitvior which is north of St Medard and 2.5km west of Neufchâteau.

At 11.00 hours 18th Korp HQ sent a cavalry patrol to Straimont (in the direction of St Medard) to determine if it was occupied by the French. On its return at 11.40 hours, it made contact with French forces at the Neufchâteau Bridge. The patrol duly reported this to a now very surprised 21st Reserve Division HQ by 12.00 hours!  Another French force had gained a position on the Divisions left on dominating ground that had split the Division’s march column in two!

21st Reserve Division troops were positioned as follows. The lead regiment at Petitvior was attacking the French. The rest of the lead Brigade was in march column in the Forêt de Blancs Cailloux to the west of Neufchâteau, along with most of Divisional Artillery Regiment. Two batteries of the artillery regiment were still to the east of the forest. The lead regiment (87th RIR) of the rear brigade was in Neufchâteau, and the other regiment (8oth RIR) on the road north of Neufchâteau.

Orders are urgently required!

Elements of the 25th Reserve division are to the east of Neufchâteau;
25th RFAR at Offaing,
83rd RIR at Hamipre,
163rd RI between Offaing and Hamipre.

Germane Doctrine and order of March 1914
Advance Guard
Divisional Cavalry squadron
1st Infantry Regiment (3 battalions)
1st battalion
MG Company
2nd Battalion
3rd Battalion
Divisional Engineer Company
Artillery Abteilung (3 batteries, from the Divisional artillery Brigade)

Main body
1st Infantry Brigade HQ
2nd Infantry Regiment
Divisional HQ
Divisional Artillery Brigade (3 Abteilung each of 3 batteries)
2nd Infantry Brigade (2 Infantry Regiments & HQs)

Notes
A Reserve Division had only one artillery regiment of 2 Abteilung each of three batteries. This was kept together as the Divisional artillery in the order of march.

Sometimes in an Active Army Corp an artillery abteilung was also attached to the second Infantry Brigade.

German Divisions had three squadrons of cavalry, the other two would be providing local reconnaissance and security.

There would be a gap of 1km between the rear of the advance guard, and the head of the main-body. The advance guard would march out approximately ½ hour ahead of the main body.

Doctrine
German doctrine on meeting an enemy position that the cavalry screen could not force to retire, or penetrate to acquire more information, was for the advance guard to deploy defensively and begin a fire fight to gain fire superiority. The rear battalions of the advance guard would deploy to the flanks, often one was kept in reserve. The attached abteilung of guns would deploy in a concealed position as standard practice, with their forward observation officer establishing a fixed observation post connected by telephone to his abteilungs position. The observation post would be position so that he could see the both the enemy and friendly infantry positions. The machine gun company was kept as a massed fire reserve by the regimental commander to be deployed forward into the firing line at the decisive point in the fire fight.

Usual deployment practice was keep one battalion in each Infantry Regiment in reserve and a further battalion from either Infantry Regiment in a Brigade reserve. They were fed into the fire fight as required.

 As fire superiority was gained and the enemy weakened, the regimental firing line would advance in stages to a point where they could assault the enemy position. This was purposely a line to avoid any part becoming isolated and suffering from concentrated enemy fire. The whole action of a fire fight from initial deployment to final assault was expected to take 3-4 hours and upto 20% casualties.

As other infantry formations in the Division came up they were deployed to the flanks with the express purpose to turn the enemy’s flanks and either to surround him or force him to retire.

The divisional artillery would initially be used to silence or drive off the enemy’s artillery. It would then support the fire fight/s at the decisive points, though the infantry were expected to be able to gain fire superiority and advance without artillery support. If a Corp heavy field howitzer regiment (150mm) was available its primary mission was counterbattery fire, engaging individual enemy batteries one at a time by the whole regiment.

If direct fire by field guns was required, one or two guns would be detached from a battery and pushed forward to support the infantry. It was not usual for batteries to operate independently.

Pursuit was carried out by fire from the artillery and infantry, while divisional cavalry would harry the enemy’s rearguards. The army level Cavalry Divisions would attempt to head the enemy off by fast parallel flank marches. Once the attacking troops had rallied and the battlefield secured a new advance guard was formed, usually from reserves not involved in the battle.

Reconnaissance and security was carried out at Divisional and Army level

Defensive positions consisted of a single strongly held line on high ground. Artillery would be concealed behind a crest, with observers forward. Strong reserves would be held ready nearby in concealed positions to counterattack.