First off a group of 12 x 28mm Roman Legionaries that have been kicking around in my 'lead mountain' for several years, I bought these on a whim but can't remember now, where they came from. Remember thinking that they would look cool painted-up but have never had time or inclination to paint these once I got them home!
 |
| The raw figures with first steel, red & flesh layers added |
I'm afraid that I have forgotten who the manufacture was for these figures, but having painted these, I was right! They do look cool!
 |
| Roman Legion Cohort of 12 x 28mm figures |
Due to the large amount of metal work on these figures I undercoated them black and then dry-brushed on a suitable steel colour,I wanted the figures to have a strong presence on the wargame's table so used a lot of red for tunics, shields and helmet plumes.
 |
| Officer and shield detail |
The rest was simple - flesh and leather with a few details picked out in brass. I gave the chap's skin a flesh wash to add tone and the sprayed with matte varnish before basing.
It's my personal view that for most ancient armies, the key to a spectacular army, is getting the shields right, in the case of Romans these have to be uniform and that is something I struggle to do! For these figures I used the original paper shields that I think came with the first Warlord Games plastic box set. I attached to the painted shield with PVA glue and then varnished with Army Painter matte varnish to seal them in place, job done!
Calculations; 12 x 28mm Infantry Figures @ 5 Points ea. = 60 Points.
 |
| Unpainted figure |
 |
| Completed! |
I glued it to a 2 pence piece and undercoated with white paint and layered on the colours in my usual way. I initially did his under robe in a crimson colour, but then decided I didn't like it and want to go for a classic ochre and jade blue look and feel. I think I have some old Games Workshop skeletons up in the loft or out in the garage in those colours, this chap can join them.
Anyway, I used a thick mix of ochre paint to block out the crimson that I'd previously used and then dry brushed with Citadel Bone paint, I also highlighted his flesh with the same bone colour to make him look less healthy!
The snake on the staff was deliberately painted in bright colours, to contract the figure and the base was left largely sand, with a couple of dry grass tufts to show a more arid environment.
Calculations; 1 x 28mm Infantry Figures @ 5 Points ea. = 5 Points.
 |
| Raw figures, prior to undercoat |
I like painting up officers and commanders of this period as it offers a little scope to give these little fellows a slightly different take on the uniforms of the period.
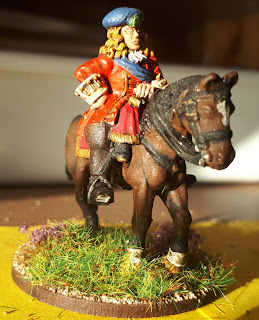
Firstly - I have to say my main area of interest is the Franco-Dutch Wars in the 1670s, so pushing out to Siege of Vienna is a bit of a stretch for these figures. Additionally a couple of these figures are actually Marlburian from the early 1700s. As such I often change the tricorns on these figures to more relaxed floppy hats of the earlier period.
However, I decided to go with tricorns on three of these figures as there is no real hard evidence as to when the fashion for pushing up three sides of the slouch hats started. I did change one figure to have a highland bonnet after cutting off it's original hat.
The figures were painted a variety of colours, the Scots officer in Government Red,whilst the other three were deliberately kept more generic to allow deployment in any army of the period.
The results are as below...
 |
| Reiver Castings Officer |
 |
| Converted Scots Officer |
 |
| Another Front Rank Officer |
 |
| Probably my favourite of the group! |
Calculations; 4 x 28mm Mounted Figures @ 10 Points ea. = 40 Points.
 |
| Rear side view of Caisson |
 |
| Front side view of Caisson |
Calculations; 1 x 28mm Horse @ 5 Points ea. = 5 Points.
1 x 28mm Limber @ 5 Points ea. = 5 Points.
TOTAL 10 Points
TOTAL Points - 60 + 40 + 10 +5 =115 Points